
This chicken cutlet recipe reminds me of those moments. There’s a memory I carry from my childhood that never gets old coming home from school to the smell of something sizzling in the kitchen. This chicken cutlet recipe reminds me of those moments every single time. My mom would be standing at the stove, golden-brown chicken cutlets crackling in hot oil, and before I could even drop my school bag, I’d already stolen one off the plate. That first bite crispy on the outside, juicy and perfectly spiced on the inside was pure magic. If you’ve been looking for that same feeling in your own kitchen, you’re in exactly the right place with this chicken cutlet recipe.
This chicken cutlet recipe is the real, tested version not a rushed copy-paste job. I’ve made this dish dozens of times, tweaked the spices, experimented with coatings, and yes, survived a few batches that fell apart in the pan (I’ll make sure that doesn’t happen to you). By the end of this guide, you’ll know exactly how to make crispy, juicy chicken cutlets from scratch, If you enjoy homemade chicken recipes, you should also check out my [simple-chicken-stock-recipe] where I shared another easy chicken recipe.
What Is a Chicken Cutlet Recipe?
In this recipe, a chicken cutlet is essentially a boneless piece usually breast or thigh that’s been pounded thin, coated in a seasoned breadcrumb mixture, and then fried (or baked) until beautifully golden. This chicken cutlet recipe creates a perfectly crunchy outside with a juicy and flavorful inside. Think of it as the more approachable, everyday cousin of a schnitzel or a chicken parmesan without the sauce.
In Pakistani and South Asian kitchens, chicken cutlets are a staple snack and party food packed with warm spices like cumin, coriander, and green chilies. In Western cooking, they tend to be milder, often served with pasta or in sandwiches. The beauty of this dish is that it genuinely works both ways, and once you master this chicken cutlet recipe, you can take it in any direction you like.
Fun fact: The word ‘cutlet’ comes from the French ‘côtelette’, meaning a small rib. Over centuries, it evolved to describe any thin, breaded, and fried piece of meat. Now it belongs to every cuisine in the world and honestly, it deserves to.
Why You’ll Love This Chicken Cutlet Recipe
- Ready in under 45 minutes: From prep to plate, this is genuinely quick weeknight food.
- Crowd-pleasing every time: Kids love it, adults love it, even picky eaters can’t resist the crispy coating.
- Incredibly versatile: Serve it as a snack, stuff it in a sandwich, or make it the star of a dinner plate.
- Budget-friendly: Chicken breast is affordable, and the rest of the ingredients are pantry staples.
- Freezer-friendly: Make a big batch and freeze them for busy days. They reheat beautifully.
- Endlessly customizable: Bake them, air-fry them, add cheese inside, or dial up the spice. This recipe is your canvas.
Ingredients for This Chicken Cutlet Recipe
This chicken cutlet recipe uses simple pantry ingredients but delivers restaurant-quality results.
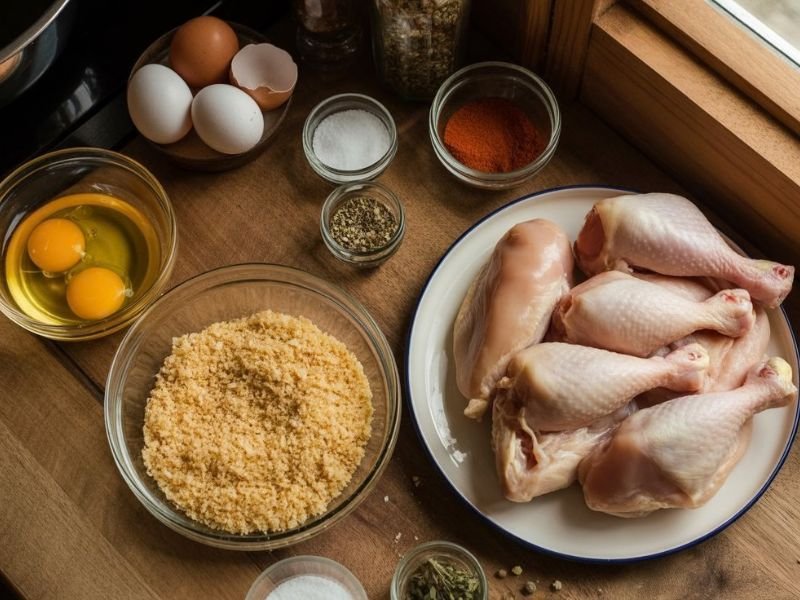
For the Chicken Mixture
- 500g boneless chicken breast or thigh (minced or finely chopped)
- 1 medium onion, very finely chopped
- 2 green chilies, finely chopped (adjust to taste)
- 2 tablespoons fresh coriander (cilantro), chopped
- 1 teaspoon cumin powder
- 1 teaspoon coriander powder
- 1/2 teaspoon black pepper
- 1/2 teaspoon red chili flakes
- 1 teaspoon salt (or to taste)
- 1 teaspoon ginger-garlic paste
- 1 tablespoon lemon juice
- 2 tablespoons breadcrumbs (to bind the mixture)
Coating Ingredients
- 2 eggs, beaten
- 1 cup breadcrumbs (panko preferred for extra crunch)
- 1/4 cup plain flour (all-purpose)
- 1/2 teaspoon salt
- 1/4 teaspoon black pepper
Oil for Frying
- Oil for shallow or deep frying (vegetable or sunflower oil works best)
A quick note on ingredients: I always recommend using panko breadcrumbs over regular ones if you can find them. Panko is coarser and lighter, which creates that signature shatter-crisp exterior that regular breadcrumbs just can’t match. As for the spices don’t skip the ginger-garlic paste. It’s doing serious heavy lifting here, adding depth and warmth that elevates the entire mixture.
Chicken Cutlet Recipe Step-by-Step Instructions
Follow this chicken cutlet recipe step by step for perfect results every time.
Step 1: Prepare the Chicken
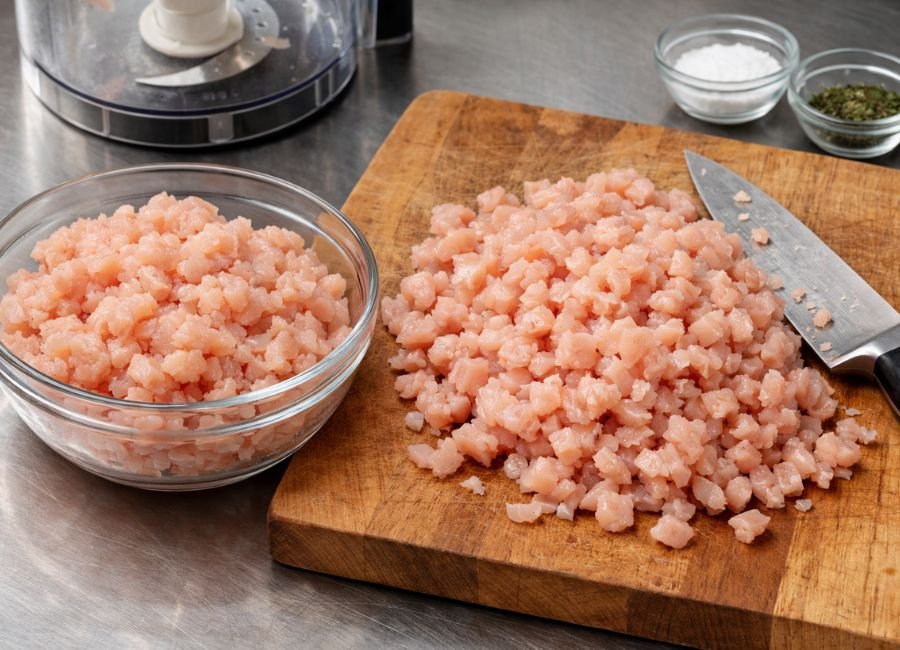
If you’re using whole chicken breast, you have two options: mince it in a food processor (pulse, don’t blend you want texture, not paste) or finely chop it by hand with a sharp knife. I personally prefer a mix of minced and chopped because it gives the cutlets a more interesting, meaty texture rather than a smooth, uniform feel.
Step 2: Mix the Filling
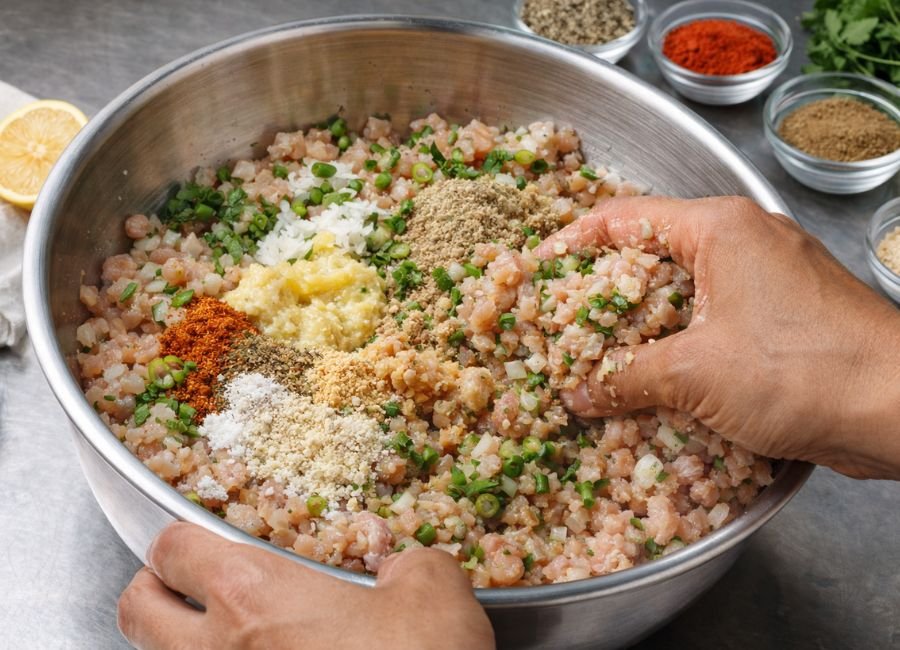
In a large mixing bowl, combine the chicken, onion, green chilies, coriander, ginger-garlic paste, all the spices, lemon juice, and 2 tablespoons of breadcrumbs. Mix thoroughly with your hands yes, your hands. A spoon won’t cut it here. You want everything evenly distributed so every bite has the same flavor profile.
Pro Tip: Squeeze the onion in a clean cloth or paper towel before adding it to the mixture. This removes excess moisture that would otherwise make your cutlets soggy and prone to falling apart during frying.
Step 3: Shape the Cutlets

Divide the mixture into 8 equal portions. Wet your palms slightly (this prevents sticking), then shape each portion into a flat, oval patty about 1.5 cm thick. Try to keep the edges smooth and the thickness even if one part is thicker than the rest, it won’t cook evenly.
Step 4: Chill the Patties (Don’t Skip This!)
Place the shaped cutlets on a tray, cover with plastic wrap, and refrigerate for at least 30 minutes. I know it’s tempting to skip this step when you’re hungry. But this is genuinely the secret to cutlets that hold their shape perfectly in the pan. The cold firms up the mixture and prevents crumbling during frying. Trust the process.
Step 5: Set Up Your Coating Station
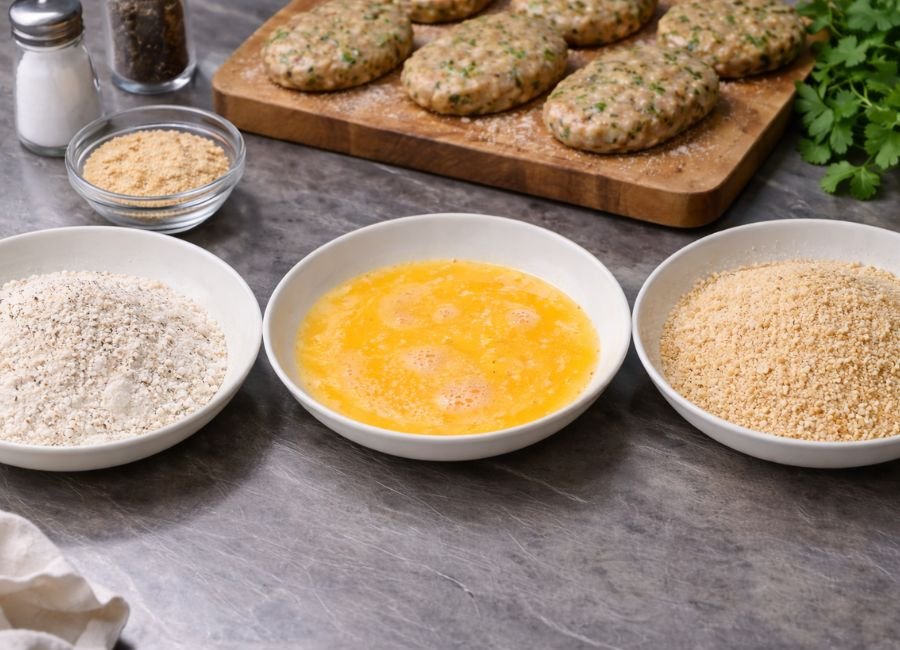
Get three shallow dishes ready: one with flour (seasoned with salt and pepper), one with beaten eggs, and one with breadcrumbs. This assembly line makes the coating process smooth and mess-free. Line them up in order flour first, then egg, then breadcrumbs.
Step 6: Double-Coat Each Cutlet
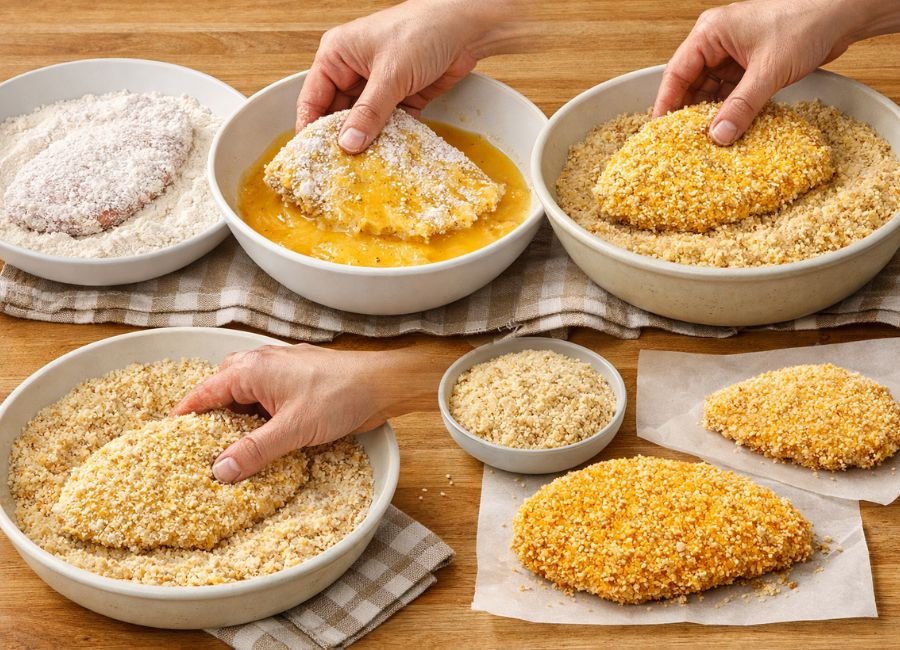
Take each chilled cutlet and coat it in flour first (shake off the excess), then dip it in beaten egg (let the excess drip off), then press it firmly into the breadcrumbs, making sure it’s fully covered. For an extra-crispy result, repeat the egg and breadcrumb step one more time double coating gives you that satisfying thick crust.
Pro Tip: Press the breadcrumbs gently but firmly onto the surface. Don’t just roll the cutlet around actually press it so the crumbs adhere properly. This is what stops the coating from sliding off during frying.
Step 7: Fry to Golden Perfection
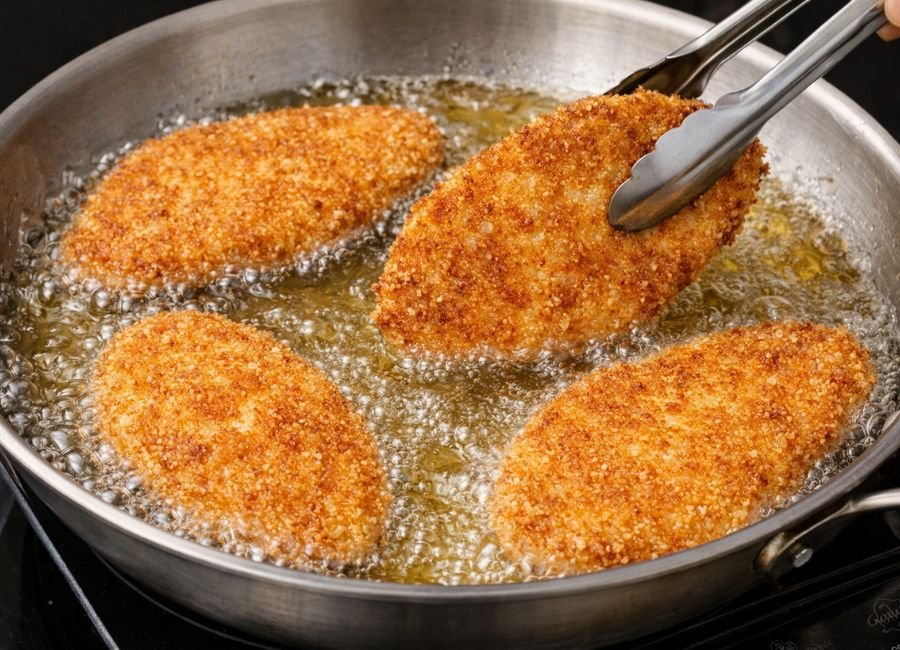
Heat oil in a wide, heavy-bottomed pan over medium heat. You want about 1.5–2 cm of oil for shallow frying. The oil is ready when a small breadcrumb dropped in sizzles immediately and floats to the surface. Carefully lower 3–4 cutlets into the oil (don’t crowd the pan this lowers the oil temperature and leads to greasy, sad cutlets).
Fry for 4–5 minutes on each side over medium heat. Resist the urge to flip them too early let the crust set. You’ll know they’re ready to flip when the edges look golden and the cutlet releases easily from the pan without sticking.
Pro Tip: Medium heat is your best friend here. High heat burns the outside while leaving the inside undercooked. Low heat makes the cutlets absorb too much oil. Medium heat = golden crust + fully cooked interior. Set a timer if you tend to wander off.
This is what makes this chicken cutlet recipe perfectly crispy and golden.
Step 8: Drain and Rest
Transfer the fried cutlets to a plate lined with paper towels. Let them rest for 2–3 minutes before serving. This gives the crust a chance to crisp up further as the steam releases, and it also prevents burning your tongue on the first bite (we’ve all done it). Serve immediately while they’re at their crispiest.
Expert Tips for the Perfect Chicken Cutlet Recipe
These tips will help you master this chicken cutlet recipe like a pro.
Control the moisture. This is the single biggest factor in whether your cutlets hold together or fall apart. Squeeze water out of the onions, don’t add too much liquid to the mixture, and always chill the patties before coating. Moisture is the enemy of a firm cutlet and a crispy crust.
Use panko for maximum crunch. Regular breadcrumbs are fine, but panko gives you a lighter, crunchier texture. If you can’t find panko, blend regular breadcrumbs very briefly you want texture, not fine powder.
Don’t skip the flour step. The flour layer creates a base for the egg to adhere to. Without it, your egg coating slides around and the breadcrumbs don’t stick properly. It’s a 10-second step that makes a huge difference.
Check your oil temperature. If the oil is too cold, cutlets absorb it and turn greasy. If it’s too hot, the outside burns before the inside cooks. Use a thermometer if you have one (175–180°C is ideal), or use the breadcrumb test described in Step 7.
Season in layers. Don’t just season the chicken mixture also season the flour and the egg wash lightly. Seasoning at every layer means flavor in every bite, not just on the surface.
My unusual tip nobody talks about: Add a teaspoon of cornflour (cornstarch) to your breadcrumbs. This is a trick borrowed from Chinese cooking the cornstarch makes the crust exceptionally crispy and helps it stay crispy longer, even after the cutlets have been sitting out for a few minutes.
Chicken Cutlet Recipe Variations & Customizations
Baked Version
Preheat your oven to 200°C (400°F). Place the coated cutlets on a greased baking tray and spray them lightly with oil. Bake for 20–25 minutes, flipping once at the halfway mark, until golden and cooked through. They won’t be quite as crispy as the fried version, but they’re genuinely delicious and you’ll feel a lot less guilty about eating four of them.
Air Fryer Version
This is quickly becoming my favorite method. Preheat the air fryer to 190°C. Spray the cutlets with a light coating of oil, then air fry for 12–15 minutes, flipping halfway through. The air fryer gives you that fried texture with minimal oil the crunch is genuinely impressive. If you own an air fryer and haven’t tried this, you’re missing out.
Spicy Desi Version
Double the green chilies, add a teaspoon of garam masala to the mixture, and include a pinch of chaat masala on top just before serving. For extra heat, mix a teaspoon of kashmiri red chili powder into the breadcrumbs before coating. This version is incredible served with mint chutney and sliced onions on the side.
Cheese-Stuffed Version
Take two smaller patties, place a cube of mozzarella or cheddar in the center of one, and press the other patty on top, sealing the edges firmly. Coat and fry as normal. When you cut into it, the melted cheese pulls apart in the most satisfying way. This version is always the first to disappear at any gathering.
Serving Suggestions for Chicken Cutlet Recipe

Chicken cutlets are wonderfully versatile when it comes to serving. Here’s how I love to enjoy them:
- As a snack or starter: Serve with mint chutney, tamarind sauce, or a tangy yogurt dip. Add sliced cucumbers and onions on the side.
- In a sandwich: Place a cutlet in a toasted bun or paratha with lettuce, tomato, and garlic mayo. It makes an incredible chicken burger alternative.
- As a main course: Pair with steamed rice and a fresh salad, or serve alongside spaghetti with a light tomato sauce for an Italian-inspired meal.
- At a party: Arrange on a platter with toothpicks and an assortment of dipping sauces sweet chili, sriracha mayo, and classic ketchup all work brilliantly.
Storage Tips for Chicken Cutlet Recipe
Refrigerator: Cooked chicken cutlets keep well in an airtight container in the fridge for up to 3 days. To prevent them from going soggy, don’t stack them on top of each other lay a piece of parchment paper between layers.
Freezer: You can freeze either the coated uncooked cutlets or the fully cooked ones. For uncooked, freeze them on a tray first until solid, then transfer to a zip-lock bag. They’ll last up to 2 months. Fry straight from frozen (add 2–3 extra minutes) no need to thaw.
Reheating: The oven is your best bet for reheating. Place cutlets on a wire rack at 180°C for 8–10 minutes. The rack allows hot air to circulate underneath, keeping the bottom from getting soggy. Avoid the microwave it makes the coating limp and sad, and nobody deserves that.
Frequently Asked Questions
Q: Can I make chicken cutlets ahead of time?
Yes shape, coat, and refrigerate up to 8 hours before frying, or freeze uncooked for up to 2 months.
Q: Why do my chicken cutlets fall apart?
Too much moisture in the mix squeeze water out of the onions, chill the patties, and add an extra tablespoon of breadcrumbs if needed.
Q: Which breadcrumbs work best?
Panko gives the crunchiest result, but regular breadcrumbs work fine crushed cornflakes are a great swap too.
Q: Can I use chicken thighs instead of breast?
Absolutely thighs are juicier and more flavorful, just remove the skin and trim excess fat first.
Q: How do I keep the inside juicy without burning the outside?
Keep cutlets 1.5 cm thick and fry on medium heat high heat burns the crust before the chicken cooks through.
Final Thoughts
This chicken cutlet recipe is simple, crispy, and perfect for any occasion. are one of those recipes that never gets old. Once you get the technique down squeeze the onions, chill the patties, medium heat it becomes pure muscle memory. I’ve made these for lazy Tuesday dinners and big family gatherings alike, and they disappear every single time.
Give this chicken cutlet recipe a try and see for yourself. If something works differently in your kitchen, or you put your own spin on it, I’d love to hear about it in the comments. That’s how good recipes get even better.